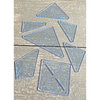
First, remove the protective paper adhesive from each template.
Determine where you'd like your stitch to appear and how many spokes you'd like it to have, then place it on your piece.
It's that easy, perfectly symmetrical woven stitches every time!
There are five white circles connecting the spokes a 1/8" apart - these will help you keep all spokes the same size. Apply a small amount of pressure to keep the template in place. Choose a circle size for your stitch and place your chalk pencil inside the templates spoke at this point, then draw a line to the center. Please note: you will need to use a chalk pencil with a long tip, such as the Sewline Trio.
Move to the next spoke making sure to start from the same circle as the previous spoke. Repeat this process until you have traced all the way around the template.
These templates can also be used without tracing, just hold them to your piece and stitch right through them! Most needles will work, an exception would be a Milliners #15.